How to Draw Electrical Circuits in Autocad 2017
Insert schematic components, generate PLC modules, insert and copy circuits.
Grid and Snap
It is recommended you work with grid lines and snap to grid points when inserting components.
- GRID - sets the grid spacing
- SNAP - sets the snap spacing
- F7 - toggles grid visibility
- F9 - toggles snap to grid on and off
Schematic Symbols Library Standards
AutoCAD Electrical provides library symbols that comply with the standards:
- IEEE 315/315A
- IEC-60617
- NFPA
The IEEE and IEC library symbols are metric. To scale the symbols for imperial, use the Modify library symbols utility. The NFPA library symbols are in inches.
The JIC standard is no longer updated and was incorporated into the NFPA 79 standards. The NFPA standard states that the library symbols are in accordance with the IEEE 315/315A standard. AutoCAD Electrical continues to provide the JIC and older IEC symbol libraries for legacy support.
Use the Project Settings tab on the Project Properties dialog box to define the path for which set of library symbols you want to use for a particular project.

Insert a Component from the Catalog Database
If you start with a list of components for a project and you already know the part numbers, you can insert a component by selecting it from the catalog database. Use the Catalog Browser palette to insert components from the catalog database. Find
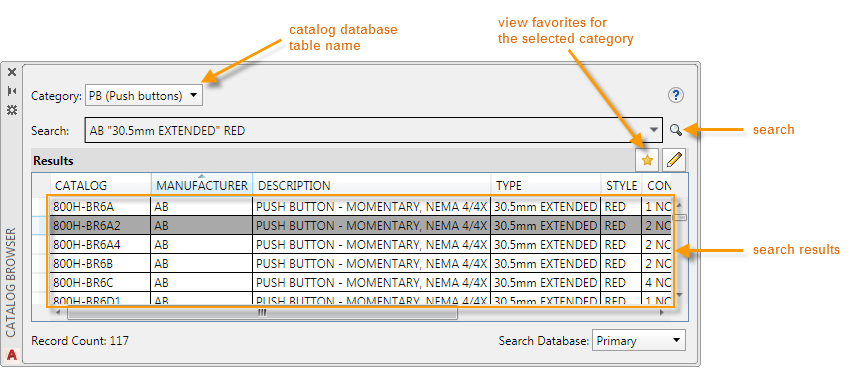
Use the search to find the catalog you want. The search values you use are also saved and can easily be used again by selecting from the search drop-down menu.

The catalog information is placed on the symbol automatically. You can edit the symbol further using the dialog box that pops up as soon as a symbol is inserted.

If the symbol you need is not yet associated to the catalog number, you can open the icon menu directly from the catalog browser to insert it. The symbol becomes associated to that catalog number from that point on. If it is a catalog value you plan to use frequently, add it to the favorites.
Insert a Component from the Icon Menu
The icon menu lets you insert a symbol by selecting the symbol type, for example a NO push button, or 3-position selector switch. Once the symbol is inserted you can annotate it with descriptions, catalog information, and so on.

There are different icon menus for the different library sets. Use the Project Settings tab on the Project Properties dialog box to define the icon menu you want to use for a particular project.

Annotate the Symbol
Once the symbol is inserted, annotate it with descriptions, catalog information, and so on.
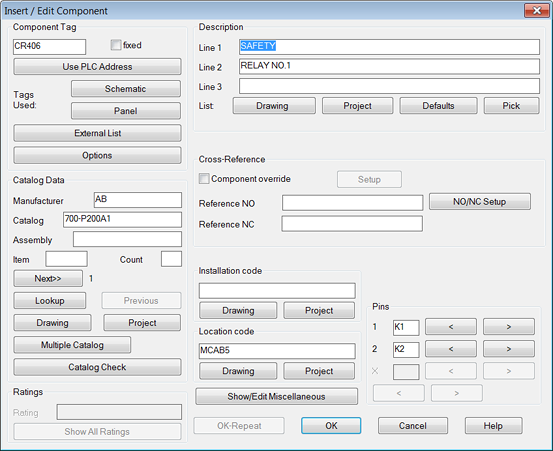
Each symbol can have a main catalog value and a number of what AutoCAD Electrical calls "multiple catalog" values. Edit a component to add, edit, or remove catalog assignments.
Click Lookup to update the main catalog value.
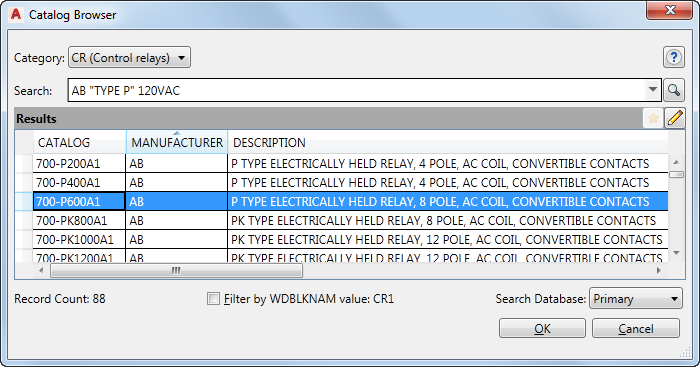
Click Multiple Catalog to add, change, or remove extra catalog values for the component.

Parent and Child Components
Some devices are represented by multiple symbols. For example, a relay may have a coil symbol and a number of contact symbols. AutoCAD Electrical uses "parent" and "child" symbols to create this relationship between symbols that represent a single device. In the relay example, the coil is the parent symbol and the contacts are child symbols.

When you insert a parent symbol, AutoCAD Electrical assigns it a unique tag value based on the drawing properties. The tag value is the identifier for a device.
Note: When drawing in the IEC standard, the installation, location, and tag value combination is used as the unique identifier for a device.
When you insert a child symbol, you select which parent it belongs to using the methods provided on the Insert/Edit Child Symbol dialog box.
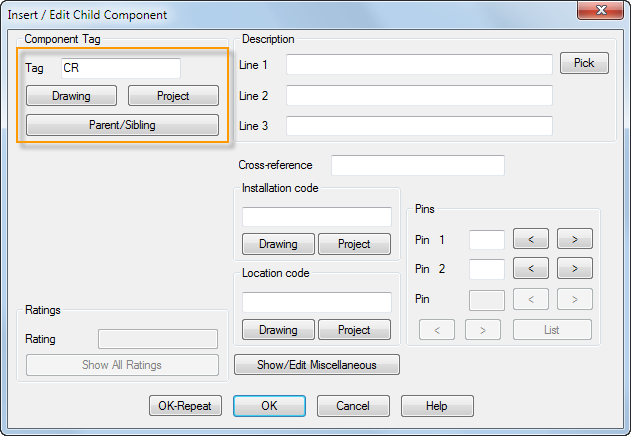
- Drawing - select from a list of possible parents on the active drawing
- Project - select from a list of possible parents from all the drawings in the active project
- Parent/Sibling - the dialog box is temporarily dismissed and you click on the parent symbol, or a child symbol already related to the parent, on the active drawing
When you select the parent, the same tag value is assigned to the child along with any other values on the parent such as installation, location, and description. Once they carry the same tag AutoCAD Electrical knows that they belong to the same device.
PLC
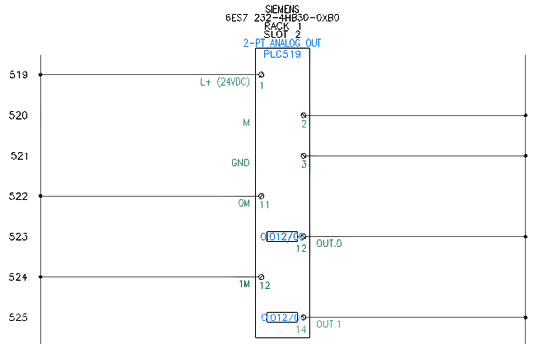
AutoCAD Electrical can generate any of hundreds of different PLC I/O modules on demand, in various different graphical styles. Modules automatically adapt to the underlying ladder rung spacing, and can stretch or break into two or more pieces at insertion time. Find

Expand the manufacturer, series, and type to find the PLC module. Select the PLC style if different from the drawing default. Select the module and click OK. Select an insertion point using the module outline to help with placement. Answer the prompts which can include rack, slot, first address, and more.
Circuits
A circuit is any collection of components and wires. If you have a circuit that you use frequently, you can save it and add it to the icon menu for easy insertion. Find
Next time you need that circuit, insert it from the icon menu. Find
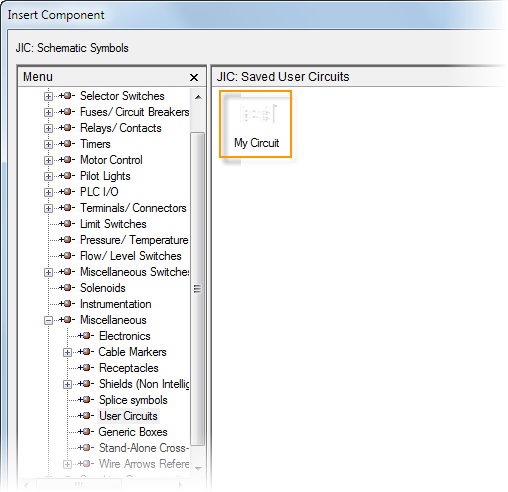
Later on we'll talk about copying and pasting a circuit.
Use Circuit Builder to insert motor control and power feed circuits. Select from various circuit options. Find
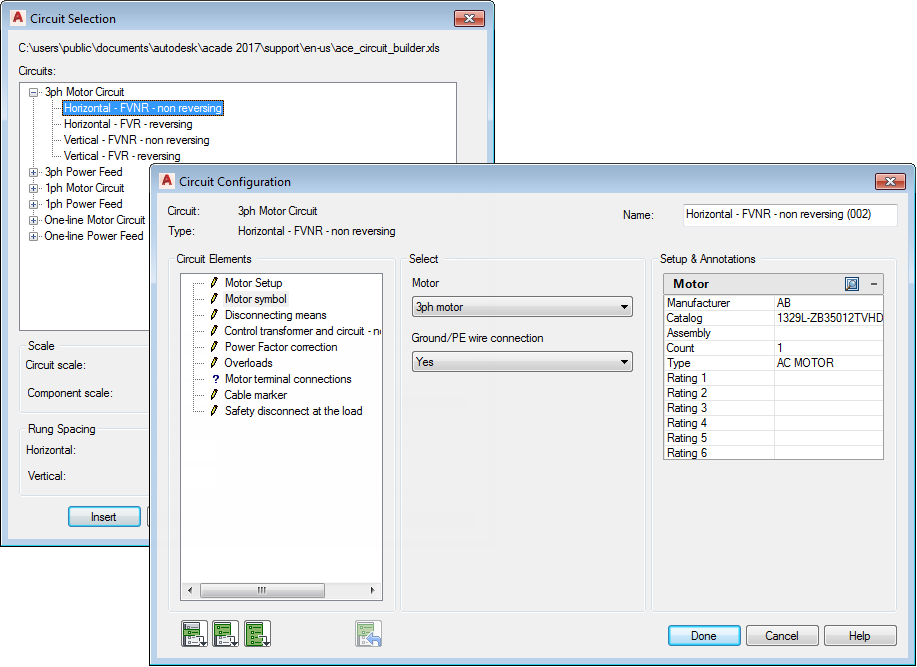
The circuit is built dynamically based on your selections.

Custom Symbols
Use Symbol Builder to create your own custom symbols compatible with AutoCAD Electrical. Find

Start from scratch or use an existing symbol that is similar as a starting point. Select the symbol type, insertion point, and orientation. It is recommended for schematic symbols to create both a horizontal and vertical version. Symbol Builder works in the AutoCAD block editor environment. Use the Symbol Builder Attribute Editor palette to insert the necessary attributes for the selected symbol type.

Draw the graphics needed for the symbol. Follow the AutoCAD Electrical naming conventions when saving a schematic symbol.
Source: https://knowledge.autodesk.com/support/autocad-electrical/getting-started/caas/CloudHelp/cloudhelp/2017/ENU/AutoCAD-Electrical/files/GUID-E4EB5B65-0836-4852-A3EB-0A888504F86C-htm.html
0 Response to "How to Draw Electrical Circuits in Autocad 2017"
Post a Comment